This weeks Guest blogger makes me VERY proud to be able to publish what I regard as one of the most comprehensive articles ever written on the subject of dubbing. If you are anything of a Fly tying geek like myself you are gonna like this a lot! The author Dennis Shaw is together with Paul Ainsworth the driving forces behind one of the best fly tying forums on the internet UKflydressing.com.
This article was originaly written for ukflydressing but I are very glad that I am able to publish it here on The way of the /:Fly:/ aswell. All the things you ever wanted to ask about dubbing but didn’t dare to; here are all the answers and them some more! Thank you Dennis!
Enjoy your reading, I sure did!!!
Introduction
All instructions assume right-handed tyers!
It’s been a while in the making, but at last here is the all new “dubbing techniques” I promised a while back. My initial thoughts when re-doing this was to simply add better quality pictures, but as you’ll see as you read on, what started as a simple “fix” turned into a complete re-do. All new photographs and text and it sort of grew a little on the old one with new sections added and more details included. There are no videos this time. They were hugely time-consuming to prepare and upload and the results were, for me, less than satisfactory.
Hopefully with the help of what follows and a little practice you’ll be able to utilise a variety of techniques to suit your own needs, and best of all, you’ll soon realise that the various dubbing techniques are actually very easy techniques to master.
What follows are a list of the most common techniques (and a few ideas for when you feel more confident) and how I use them. There are other techniques and other tyers will have their “own way” of doing things, with practice and research and by listening to others, you will soon develop your “own way.” I don’t profess to be an expert, so take what you will from this article and use it and adapt it to your own needs.
Let’s start with a few tips to help you…
Wash your hands before you start tying. Dirty hands will discolour dubbing.
If you have very dry or chapped hands you may find dubbing difficult, the “cure” is very simple, regular applications of hand cream. Believe me when I say this will make a huge difference, not only to the dubbing process, but also to many other areas of your tying. I suffered from dry, chapped hands for many years until I started using hand creams to replace lost moisture in my hands. I now use hand cream two or three times daily and the difference it has made is astounding!
When dubbing less is better! You will be surprised at just how far a tiny spec of dubbing will go, and in most cases how much better, more translucent and life-like your flies will look.
In the following posts I have concentrated on the techniques, one aspect of dubbing which I haven’t touched on is the effects achieved by using different threads and under-bodies. When you start using the techniques try using threads to compliment or contrast with the colour of the dubbing to see how much they can affect the final outcome. Also try different under-bodies. For instance, try dubbing a body over a dark thread under-body, then do it again with a tinsel under-body. You will be surprised at how much a simple thing, like the colour of the thread, can affect the final outcome.
Most of the terminology used in the following threads are self explanatory, but just to clarify and avoid confusion here are a few regularly used ones..
Dubbing medium – This simply means whatever material is used for dubbing.
Staple length – Means the average length of the individual strands of dubbing.
Dubbing noodle** – Simply an amount of dubbing gently rolled or pulled into a small elongated wad of dubbing.
Dubbing rope** – What you have when you complete a split thread loop or dubbing loop. Dubbing ropes are also available pre-made in packets.
Work in the fingers (or hands) – Means to work the fibres in your fingers or in the palm of your hand by rolling and/or pushing the materials together and then tearing/pulling them apart repeatedly until you have achieved the desired effect.
Under-fur – The soft downy fur next to the skin. The under-fur on animals is usually a drab pale colour.
Guard-hair – The longer spikey hair. The guard hares are usually coloured, (especially towards the tips) these hairs are what give the animal its colour.
**Whilst doing some research for this article I discovered that there is some confusion as to what a “Dubbing Noodle” is, some people refer to a dubbing noodle to be what I call a dubbing rope. At the risk of opening up a debate on the subject, I believe my use of the terminology to be correct.
*edit*
When I started this article Seal’s Fur was a readily available dubbing, though not necessarily a “politically correct” one to use. It now looks though that a ban on the sale and/or use of seal products, including Seal’s Fur, is looking inevitable. I have kept the references to it and its uses in because it is still available for the moment, and hopefully you and I will still be able to use any stock we have!
OK, let’s get started…
Tools
The basic tools I use are shown below.
![[image]](https://i0.wp.com/i159.photobucket.com/albums/t149/scot2flyfish/Dubbing%20Techniques/dubbing-tools.jpg)
From left to right they are…
1 – The most important tool of all, your hands!
2 – Velcro, used to “rough” up bodies. This one is simply the “hooked” side of a piece of Velcro glued onto a lollipop stick.
3 & 4 – Dubbing rakes. The brass one is from Ken Newton. The white one is the “Ceramiscrape” from Lawrence Waldren, I think the best dubbing rake available. You can also make one from an old hacksaw blade.
5 – Dubbing twister. Mainly used for twisting dubbing loops with very course materials.
6 – Dubbing Whorl. Used for spinning dubbing loops.
7 – Nit comb. Used in the preparation of various long fibered yarns and wools.
This second picture is a coffee grinder, used during preparation or blending.
![[image]](https://i0.wp.com/i159.photobucket.com/albums/t149/scot2flyfish/Dubbing%20Techniques/coffee-grinder.jpg)
These are the main tools I use when using or preparing dubbing. Apart from the hands none are essential, but they do make life easier.
What can I use for dubbing?
There are literally thousands of commercially available dubbing materials and 100x’s that in materials you can utilize for a dubbing medium.
Below are a few selections, but these are just the tip of the iceberg.
Here we have a selection of commercially available synthetic or part sythetic dubbings.
Polypropylene, SLF, Spectrablend, Antron, Glister, Lite-Brite and Mohair with a bit of flash added.
![[image]](https://i0.wp.com/i159.photobucket.com/albums/t149/scot2flyfish/Dubbing%20Techniques/dubbing-materials.jpg)
Here we have a selection of natural materials on the skin.
Snowshoe Rabbit, Mole, Fox Squirrel, Mink, Hare’s Mask. You can use virtually any animal fur as a dubbing medium.
![[image]](https://i0.wp.com/i159.photobucket.com/albums/t149/scot2flyfish/Dubbing%20Techniques/dubbing-materials-5.jpg)
Here is a selection of fur taken from the skin.
The top row is three different blends of fur taken from a Hare’s mask. The darkest one on the right is the dark hair taken from near the tip of the ear.
The bottom row is Mole and Rabbit.
![[image]](https://i0.wp.com/i159.photobucket.com/albums/t149/scot2flyfish/Dubbing%20Techniques/dubbing-materials-1.jpg)
This is a small selection of dyed and blended dubbings of my own. They are mainly a blend of Seals Fur, Rabbit, Antron and Hare.
![[image]](https://i0.wp.com/i159.photobucket.com/albums/t149/scot2flyfish/Dubbing%20Techniques/dubbing-materials-3.jpg)
Not to forget Seals Fur. An important point to remember when buying seal’s fur is to buy baby Seal, some places sell adult seal. Adult seal is, quite simply, a pig to work with. Avoid it like the plague!
![[image]](https://i0.wp.com/i159.photobucket.com/albums/t149/scot2flyfish/Dubbing%20Techniques/dubbing-materials-2.jpg)
Finally we have a selection of materials many wouldn’t normally associate with dubbing.
Mending Yarn, Wool, Egg Yarn, Sparkle Yarn and Zelon. All of these, and things like carpet yarn and a million other unusual items can be used as a dubbing medium. I will cover how to use these later in the post.
![[image]](https://i0.wp.com/i159.photobucket.com/albums/t149/scot2flyfish/Dubbing%20Techniques/dubbing-materials-4.jpg)
What is pictured is only a tiny selection of what’s available. A look through the many step by steps will give you a fair idea of what dubbings are the preferred choice for particular styles/patterns of flies.
Properties of some dubbing materials.
There are so many different types of dubbing available that it would be impossible for me to show and explain them all.
So below is a resume of some of my favourite dubbings and what I use them for. (Mainly)
It is not meant to be a comprehensive list or appraisal of the various dubbings available. Any brands or types or their uses mentioned are purely for reference, they are not necessarily my recommendations.
What I want you to take from the post is a basic understanding of some of the dubbings that I use and why. With experience you will develop your own favourites and when to use them.
When choosing your dubbing you have many choices, do you want a natural or synthetic dubbing, do you want the texture to be coarse, medium or fine, should the dubbing absorb water or not? At this point you’re probably thinking; Crikey! How do I know? Well it’s not as difficult to decide as you might think; it’s really just a process of elimination…
Natural or synthetic? This is probably the most difficult choice you will have to make, and one that only experience can really teach you. Personally I tend to err on the side of natural for wet flies and synthetic for dry flies. The main reasons for my choices are that natural materials tend to absorb water and I think they have a more life-like appearance on wet flies, though some of the synthetics dubbings available to us now come close to the appearance of natural dubbings, and are also an excellent choice. Most synthetics dubbings do not absorb water and many are lighter than water, so make a good choice for dry flies. There are many exceptions though, natural materials which come from water-borne animals such as beavers, seals and otters also make excellent dry fly dubbing. To add to the confusion, modern floatants such as Watershed, Dilly Wax and Gink are so good as to virtually eliminate any problems of water absorption! So this is one choice that only experience will teach you. It may even be down to simply choosing natural materials because you don’t like synthetics or vice-versa because you don’t want to use fur from a dead animal!
Fine, medium or coarse texture? Many things can affect your choice here. Do you want a tight or smooth body, if yes then generally this will easier to achieve with a fine textured dubbing. If no, you want a fuzzy body with little or no defined shape, then maybe a medium or coarse textured dubbing would be a better choice. Hook size can also affect your choice, if you’re tying very small flies for example, a fine textured dubbing would, generally, be a better choice.
Should it absorb water or not? If it’s a wet fly then a dubbing which absorbs water can be an advantage, once it is wet it may help the fly sink. If it doesn’t absorb water you may need to weight the fly to help it sink. If it’s a dry fly, a dubbing which absorbs water may be a disadvantage, so one that doesn’t absorb water may be a better choice.
So as you can see by a process of elimination you can make your choices a little easier. Though as stated above, with experience you will soon develop your own personal favourites to suit particular flies.
Let’s look at some commonly available examples, but remember these are just a few of my chosen favourites and are not meant as recommendations.
HARE’S MASK
![[image]](https://i0.wp.com/i159.photobucket.com/albums/t149/scot2flyfish/Dubbing%20Techniques/hare.jpg)
The picture above is a blend of hare’s mask fur taken from the cheeks of the mask. By choosing fur from different places on the hare’s mask you can get a range of colours from a pale fawn (as above), through ginger to dark grey. (Almost black)
The texture is fine to medium, depending on the part of the mask it came from.
I use hare’s mask for a variety of nymphs, wet and dry flies. It touch dubs well and you can also form a noodle with it for dubbing loops. It is also very easy to twist dub. You can alter the spikiness of hare by controlling the guard hare to underfur ratio. More guard hares = spikier dubbing.
This is a picture of the mask, as you can see there is a huge range of colours and textures.
![[image]](https://i0.wp.com/i159.photobucket.com/albums/t149/scot2flyfish/Dubbing%20Techniques/mask.jpg)
SQUIRREL
![[image]](https://i0.wp.com/i159.photobucket.com/albums/t149/scot2flyfish/Dubbing%20Techniques/squirrel.jpg)
The picture above is squirrel fur taken from the back of a red fox squirrel pelt. Squirrel is similar to hare’s fur, and as such can be used in the same situations as hare.
RABBIT
![[image]](https://i0.wp.com/i159.photobucket.com/albums/t149/scot2flyfish/Dubbing%20Techniques/rabbit.jpg)
Rabbit is another with similar properties to hare, and again, can be used in the same situations. The underfur is a little softer than hare’s and squirrel underfur. I tend to use rabbit more as a binding agent when blending coarser dubbing.
MOLE
![[image]](https://i0.wp.com/i159.photobucket.com/albums/t149/scot2flyfish/Dubbing%20Techniques/mole2.jpg)
Mole is fine textured and short fibred with no guard hairs. This is a great fur to use for touch dubbing.
BEAVER
![[image]](https://i0.wp.com/i159.photobucket.com/albums/t149/scot2flyfish/Dubbing%20Techniques/beaver.jpg)
This is dyed beaver underfur; a fine textured dubbing, great for forming slim bodies on dry flies.
MUSKRAT
![[image]](https://i0.wp.com/i159.photobucket.com/albums/t149/scot2flyfish/Dubbing%20Techniques/muskrat.jpg)
This is muskrat underfur. Similar in texture to beaver, and like beaver it can be used to make nice slim bodies on dry flies.
SEAL’S FUR
![[image]](https://i0.wp.com/i159.photobucket.com/albums/t149/scot2flyfish/Dubbing%20Techniques/Seals-fur.jpg)
Seal’s fur is a medium textured dubbing with a unique translucence and sheen. This is the dubbing (IMHO) to use on traditional style wet flies and on dry flies such as the Shipman’s Buzzer.
FLY-RITE
![[image]](https://i0.wp.com/i159.photobucket.com/albums/t149/scot2flyfish/Dubbing%20Techniques/fly-rite.jpg)
Fly-rite is one of a plethora of fine textured synthetic dubbings available. It doesn’t absorb water and is also lighter than water, making it ideal for medium to small to tiny dry flies.
SPIRIT RIVER FINE AND DRY
![[image]](https://i0.wp.com/i159.photobucket.com/albums/t149/scot2flyfish/Dubbing%20Techniques/spirit-river-fine-and-dry.jpg)
Another fine textured synthetic similar to Fly-rite above. There are so many of these types of dubbing available that it really is a case of “take your pick”
WCB FLYTING EASY DUB
![[image]](https://i0.wp.com/i159.photobucket.com/albums/t149/scot2flyfish/Dubbing%20Techniques/WCB-Flyting-easy-dub.jpg)
Another synthetic similar to the two above, but this one is a slightly coarser texture. This is good for medium to larger dry flies. It is also great for the dubbing noodle technique shown below.
ORVIS SPECTRABLEND
![[image]](https://i0.wp.com/i159.photobucket.com/albums/t149/scot2flyfish/Dubbing%20Techniques/orvis-spectrablend.jpg)
Orvis Spectrablend is one of my favourite “all round” dubbings. On its own it makes great bodies on nymphs or dry flies, it is also great for blending with natural furs, such as hare’s mask, to add a little sparkle. According to Orvis it incorporates translucent and reflective trilobal Antron fibers to add sparkle to any fly.
SLF MASTER CLASS FINESSE BLEND
![[image]](https://i0.wp.com/i159.photobucket.com/albums/t149/scot2flyfish/Dubbing%20Techniques/slf-master-class-finesse-bl-1.jpg)
This is another favourite of mine. SLF stands for Synthetic living fibre. I like to use it for bodies and thoraxes on small buzzers and as a substitute for seal’s fur on small wet flies. It is also good on medium to small dry flies.
HARELINE DUBBIN, INC ICE DUB
![[image]](https://i0.wp.com/i159.photobucket.com/albums/t149/scot2flyfish/Dubbing%20Techniques/Hareline-dubbing-inc-ice-du.jpg)
Ice dub is a medium textured sparkly dubbing, great for blending with natural dubbings such as hare’s mask to add a little bit of sparkle, or on its own it can be used to add a “hot spot” to any fly.
VENIARDS GLISTER DUBBING
![[image]](https://i0.wp.com/i159.photobucket.com/albums/t149/scot2flyfish/Dubbing%20Techniques/Glister.jpg)
Glister is a medium to coarse textured sparkly dubbing. Like ice dubbing this can be blended with natural dubbings to give an extra sparkle to them, or used on its own to add “hot spots”
As I said at the beginning of this post these are just a few of my favourite dubbing. There are literally hundreds more to choose from, available in a huge variety of colours and textures.
In time you will find your own favourites and their uses, but until then, hopefully the above will help you to make your choices a little less haphazardly!
Preparing Dubbing.
There are various ways of preparing your dubbing. Below I have outlined some of the most common methods. I am only showing you how to prepare them here and a few examples of flies tied with the prepared dubbing. Their application is shown in separate step by steps.
Natural Furs.
The main technique for harvesting natural fur is by using a dubbing rake. There are many dubbing rakes available ready made. You can also make one yourself using a hacksaw blade attached to a piece of Dowling, or similar. I personally use commercially available ones. My weapon of choice being the “Ceramiscrape” made by Lawrence Waldron.
Pictured here are a Stonefly dubbing rake, a Ken Newton dubbing rake and the “Ceramiscrape.” The first two do the job very well, the “Ceramiscrape” is, in my opinion, exceptional.
![[image]](https://i0.wp.com/i159.photobucket.com/albums/t149/scot2flyfish/Dubbing%20Techniques/Raked-1.jpg)
Using a dubbing rake is a simple process.
Simply draw the rake (under pressure) across the fur, following the direction that the fur lays.
I have shown you here on a Fox Squirrel skin, but the process is the same on all skins.
![[image]](https://i0.wp.com/i159.photobucket.com/albums/t149/scot2flyfish/Dubbing%20Techniques/Raked-2.jpg)
After two or three draws you will have a decent amount of ready mixed dubbing.
![[image]](https://i0.wp.com/i159.photobucket.com/albums/t149/scot2flyfish/Dubbing%20Techniques/Raked-3.jpg)
Here in close up you can see the blend of underfur and spikey guard hairs achieved.
![[image]](https://i0.wp.com/i159.photobucket.com/albums/t149/scot2flyfish/Dubbing%20Techniques/Raked-5.jpg) –
–
This is mole using the same technique.
![[image]](https://i0.wp.com/i159.photobucket.com/albums/t149/scot2flyfish/Dubbing%20Techniques/Mole.jpg)
If you don’t have a dubbing rake, another technique you can use on mole is to scrape a razor blade over the fur. Razor blades are sharp, exorcise extreme caution when using!
![[image]](https://i0.wp.com/i159.photobucket.com/albums/t149/scot2flyfish/Dubbing%20Techniques/Mole-1.jpg)
The result
![[image]](https://i0.wp.com/i159.photobucket.com/albums/t149/scot2flyfish/Dubbing%20Techniques/razormole.jpg)
Seal’s Fur dubbing almost always come ready to use, but in some cases the staple length of the fur is too long.
![[image]](https://i0.wp.com/i159.photobucket.com/albums/t149/scot2flyfish/Dubbing%20Techniques/Twist-Dubbing.jpg)
The “fix” is simply a case of tearing it a few times between your fingers.
![[image]](https://i0.wp.com/i159.photobucket.com/albums/t149/scot2flyfish/Dubbing%20Techniques/Twist-Dubbing-3.jpg)
You will then be left with a more manageable medium.
![[image]](https://i0.wp.com/i159.photobucket.com/albums/t149/scot2flyfish/Dubbing%20Techniques/Twist-Dubbing-2.jpg)
Other dubbing mediums
Wool
As well as normal dubbing mediums such as animal furs and purpose made synthetic dubbing you can also use a range of mediums found in the average flytying kit and/or sewing/knitting box.
Most of these mediums will need some simple preparation before you can use them.
One of the most common items available is wool. It comes in a variety of colours, is cheap and easy to use.
To prepare the wool you will need the following. A fine toothed comb and a pair of scissors.
The comb shown is a nit comb I purchased from Boots for this job.
![[image]](https://i0.wp.com/i159.photobucket.com/albums/t149/scot2flyfish/Dubbing%20Techniques/Wool.jpg)
Now simply comb the wool to separate the strands. Do a small section at a time, if you try to do too much it will get stuck.
![[image]](https://i0.wp.com/i159.photobucket.com/albums/t149/scot2flyfish/Dubbing%20Techniques/Wool-1.jpg)
Once you’ve combed it a few times it will look like this.
![[image]](https://i0.wp.com/i159.photobucket.com/albums/t149/scot2flyfish/Dubbing%20Techniques/Wool-2.jpg)
Remove it from the comb.
![[image]](https://i0.wp.com/i159.photobucket.com/albums/t149/scot2flyfish/Dubbing%20Techniques/Wool-3.jpg)
Then cut it in to short to medium lengths.
![[image]](https://i0.wp.com/i159.photobucket.com/albums/t149/scot2flyfish/Dubbing%20Techniques/Wool-4.jpg)
Finally, work it a little in your fingers and it’s ready to use.
![[image]](https://i0.wp.com/i159.photobucket.com/albums/t149/scot2flyfish/Dubbing%20Techniques/Wool-5.jpg)
![[image]](https://i0.wp.com/i159.photobucket.com/albums/t149/scot2flyfish/Dubbing%20Techniques/Wool-6.jpg)
Whilst combing some of the fibres will stick in the comb.
![[image]](https://i0.wp.com/i159.photobucket.com/albums/t149/scot2flyfish/Dubbing%20Techniques/Wool-7.jpg)
Pull these out and work in your fingers as well.
![[image]](https://i0.wp.com/i159.photobucket.com/albums/t149/scot2flyfish/Dubbing%20Techniques/Wool-8.jpg)
Shown here is a fly dubbed with a body of black wool prepared using the technique shown.
![[image]](https://i0.wp.com/i159.photobucket.com/albums/t149/scot2flyfish/step%20by%20steps/WBZ-11.jpg)
You can also use the same technique on other mediums as well.
Shown here is a trainer shoe lace prepared in the same way.
![[image]](https://i0.wp.com/i159.photobucket.com/albums/t149/scot2flyfish/Dubbing%20Techniques/Bootlace.jpg)
![[image]](https://i0.wp.com/i159.photobucket.com/albums/t149/scot2flyfish/Dubbing%20Techniques/Bootlace-1.jpg)
Here is one tied with the prepared shoe lace used as the dubbing.
![[image]](https://i0.wp.com/i159.photobucket.com/albums/t149/scot2flyfish/Dubbing%20Techniques/Example-Fly-3.jpg)
You can also use mediums such as floss and mending yarn. These don’t need combed. Simply cut into short to medium, varying lengths, then after working a little in your fingers they are ready to use.
Floss.
![[image]](https://i0.wp.com/i159.photobucket.com/albums/t149/scot2flyfish/Dubbing%20Techniques/Floss.jpg)
A fly tied with a dubbed floss body.
![[image]](https://i0.wp.com/i159.photobucket.com/albums/t149/scot2flyfish/Dubbing%20Techniques/Example-Fly-2.jpg)
Mending Yarn.
![[image]](https://i0.wp.com/i159.photobucket.com/albums/t149/scot2flyfish/Dubbing%20Techniques/Darning-Yarn.jpg)
A fly tied with a dubbed mending yarn body.
![[image]](https://i0.wp.com/i159.photobucket.com/albums/t149/scot2flyfish/Dubbing%20Techniques/Example-Fly-1.jpg)
Z-Lon.
![[image]](https://i0.wp.com/i159.photobucket.com/albums/t149/scot2flyfish/Dubbing%20Techniques/Z-Lon.jpg)
A fly tied with a body of touch dubbed Z-Lon.
![[image]](https://i0.wp.com/i159.photobucket.com/albums/t149/scot2flyfish/Dubbing%20Techniques/Example-Fly-10.jpg)
As you can see the materials you can use are almost limitless. By using the simple techniques shown here you can turn almost any medium into a usable dubbing.
Blending
Blending is a technique you can use to mix different colours and textures of dubbing.
Blending is also a useful technique to use if you have a dubbing which is too coarse to dub on its own. By adding a suitable dubbing, as a binding agent, such as rabbit you can turn an unusable dubbing into a usable dubbing.
Most of the dubbing blends here contain adult seal’s fur which is almost impossible to dub on its own, but by adding some rabbit and other materials, I made a perfectly usable dubbing with a nice mix of textures.
There are various ways of blending. If you have large amounts of dubbing to blend it’s best done mixed with warm water in a food processor/blender.
For most of us though we are only blending small amounts.
For blending small amounts of dubbing, enough for just a few flies, hand blending is perfectly adequate.
Hand blending is simply a case of working the fibres together then pulling them apart several times in your hands.
Here I am blending Red, yellow and natural Seal’s fur.
![[image]](https://i0.wp.com/i159.photobucket.com/albums/t149/scot2flyfish/Dubbing%20Techniques/Handblend.jpg)
I work them together and pull apart repeatedly with my fingers.
![[image]](https://i0.wp.com/i159.photobucket.com/albums/t149/scot2flyfish/Dubbing%20Techniques/Handblend-1.jpg)
In a short time I have a nice blended dubbing ready for use.
![[image]](https://i0.wp.com/i159.photobucket.com/albums/t149/scot2flyfish/Dubbing%20Techniques/Handblend-2.jpg)
For larger amounts of dubbing a great tool is an electric coffee grinder. These make great dubbing blender.
![[image]](https://i0.wp.com/i159.photobucket.com/albums/t149/scot2flyfish/Dubbing%20Techniques/Grinder.jpg)
A point to remember with coffee grinders is that they do not cut the dubbing, so if the staple length of the dubbing is too long, you will have tear or cut it to more manageable lengths before you blend it.
Here I have the same colours of Seal’s Fur that I have just hand blended.
![[image]](https://i0.wp.com/i159.photobucket.com/albums/t149/scot2flyfish/Dubbing%20Techniques/Grinder-1.jpg)
Pop the lid on and give it a whizz.
![[image]](https://i0.wp.com/i159.photobucket.com/albums/t149/scot2flyfish/Dubbing%20Techniques/Grinder-2.jpg)
And it will turn it into a nicely blended dubbing.
![[image]](https://i0.wp.com/i159.photobucket.com/albums/t149/scot2flyfish/Dubbing%20Techniques/Grinder-3.jpg)
![[image]](https://i0.wp.com/i159.photobucket.com/albums/t149/scot2flyfish/Dubbing%20Techniques/Grinder-4.jpg)
As shown on this fly here.
![[image]](https://i0.wp.com/i159.photobucket.com/albums/t149/scot2flyfish/Dubbing%20Techniques/Example-Fly-5.jpg)
Here I have added some Hare’s mask and Flash-Brite to the original mix.
![[image]](https://i0.wp.com/i159.photobucket.com/albums/t149/scot2flyfish/Dubbing%20Techniques/Grinder-5.jpg)
After a whizz.
![[image]](https://i0.wp.com/i159.photobucket.com/albums/t149/scot2flyfish/Dubbing%20Techniques/Grinder-6.jpg)
A fly with the resultant mix.
![[image]](https://i0.wp.com/i159.photobucket.com/albums/t149/scot2flyfish/Dubbing%20Techniques/Example-Fly-9.jpg)
A different blend of colours of the same materials.
![[image]](https://i0.wp.com/i159.photobucket.com/albums/t149/scot2flyfish/Dubbing%20Techniques/Grinder-7.jpg)
Whizz, and..
![[image]](https://i0.wp.com/i159.photobucket.com/albums/t149/scot2flyfish/Dubbing%20Techniques/Grinder-8.jpg)
A fly with the new blend.
![[image]](https://i0.wp.com/i159.photobucket.com/albums/t149/scot2flyfish/Dubbing%20Techniques/Example-Fly-7.jpg)
Finally here is a blend of Muskrat underfur and roughly chopped CDC fibres.
![[image]](https://i0.wp.com/i159.photobucket.com/albums/t149/scot2flyfish/Dubbing%20Techniques/Grinder-9.jpg)
After a whizz.
![[image]](https://i0.wp.com/i159.photobucket.com/albums/t149/scot2flyfish/Dubbing%20Techniques/Grinder-10.jpg)
And the fly tied with the mix.
![[image]](https://i0.wp.com/i159.photobucket.com/albums/t149/scot2flyfish/Dubbing%20Techniques/Example-Fly-6.jpg)
I could go on showing you an innumerable amount of possibilities, but hopefully I’ve given you enough for your imagination to run riot or at least a good grounding of the principles involved.
WAX
Where dubbing is concerned this is a contentious issue!
There are many tyers who swear by wax and there are many who think wax is unnecessary. I am firmly in the unnecessary camp.
If you wish to use wax or think that wax will make dubbing easier then use it. This is just my opinion, it is not set in stone. If you are unsure, listen to what I and others have to say then experiment your self and come to your own conclusions.
There are two reasons I don’t wax. The first is it is simply unnecessary. In the picture below I have dubbed, from left to right, Squirrel, Seals Fur, Orvis Spectrablend, Flash Bright and Glister. All without wax and onto copper wire. Proof, I think, that wax is unnecessary.
![[image]](https://i0.wp.com/i159.photobucket.com/albums/t149/scot2flyfish/flies/Dubbing%20Techniques/whynowax.jpg)
The reason that wax is unnecessary is that when you apply dubbing to the thread you are only using the thread as a convenient core for the dubbing noodle. The dubbing is simply a mish-mash of tangled fibres held together by its self and around a central core. It does not stick to the thread. You can see what I mean in this close up from the picture above.
![[image]](https://i0.wp.com/i159.photobucket.com/albums/t149/scot2flyfish/Dubbing%20Techniques/whynowax2.jpg)
If you use wax you may find it easier to get the material onto the thread, but you are only using a work around for bad technique. Surely it is better to master good technique!
By using wax you also lose the second reason I don’t use wax… control.
When I apply dubbing to the thread I can control, by sliding, where I want it.
Here I have dubbed some Hare’s Ear to the thread, as you can see there is a gap between the dubbing and the hook. If I had waxed the thread first I would have had to make two or three turns of thread before I started forming the dubbed body.
![[image]](https://i0.wp.com/i159.photobucket.com/albums/t149/scot2flyfish/flies/Dubbing%20Techniques/whynowax6.jpg)
Because I have not used wax I can now position the dubbing where I want it, by simply sliding it up the thread core.
![[image]](https://i0.wp.com/i159.photobucket.com/albums/t149/scot2flyfish/flies/Dubbing%20Techniques/whynowax5.jpg)
This means that from the very first turn of thread I will be forming the dubbed body.
![[image]](https://i0.wp.com/i159.photobucket.com/albums/t149/scot2flyfish/flies/Dubbing%20Techniques/whynowax7.jpg)
As I said at the beginning if you want to use wax or think that wax is necessary then use it. I am only offering my opinion on the subject along with the reasons why I have come to these conclusions.
Twist (Direct) Dubbing
Ok, you now (hopefully) have a good idea of what you can use and how to prepare it. So it’s time to learn how to apply it.
The first technique I’m going to show you is the simple twist dub, sometimes called Direct dubbing. This is probably the most common technique and the one you will undoubtedly use the most. I have shown the technique here using seal’s fur, the technique is the same no matter what medium you use.
I have highlighted a few words and phrases, pay particular attention to them.
Let’s just remind you of how you prepare it first.
Remember that this preparation is only necessary for dubbing with a long staple length. On dubbing such as hare’s ear you can omit this step.
Take a pinch of dubbing.
Then repeatedly push it together and pull/tear it apart to work the fibres into more manageable lengths.
![[image]](https://i0.wp.com/i159.photobucket.com/albums/t149/scot2flyfish/Dubbing%20Techniques/Twist-Dubbing-3-1.jpg)
You’re now ready to apply to the thread. Two things to remember here are “less is better” and “little and often!”
“Less is better?” Most beginners and many experienced tyers use too much dubbing. Try not to fall into that trap by using much less than you think you’ll need. You will be surprised at how far a tiny pinch of dubbing will go.
“Little and often?” It is easier to add more dubbing than it is to remove excess. With experience you can usually judge how much you need, but to begin with it is better to use less.
Right, let’s get some fur round that thread!
To get the dubbing round the thread core we have to twist it round the thread. You can twist it clockwise or anticlockwise, the choice is yours. I twist clockwise which is shown in the instructions. If you prefer to twist anticlockwise, the instructions are exactly the same, the only difference being the direction of the twist.
Only ever twist the dubbing in one direction. Do not twist it back and forwards!
Take a small pinch of your prepared dubbing. Offer it up to the thread between your index finger and thumb. Then push your thumb forward (to the left as shown) and at the same time draw your finger back. (To the right as shown) This will cause the dubbing to twist round the thread core between your finger and thumb.
![[image]](https://i0.wp.com/i159.photobucket.com/albums/t149/scot2flyfish/Dubbing%20Techniques/Twist-Dubbing-5-1.jpg)
At the same time as you are twisting the dubbing you need to apply pressure between your finger and thumb, meaning you squeeze and twist at the same time.
![[image]](https://i0.wp.com/i159.photobucket.com/albums/t149/scot2flyfish/Dubbing%20Techniques/Twist-Dubbing-6-1.jpg)
Repeat these motions several times until you are happy with the resulting dubbed thread. You can let go at any time to check. Also at any time you can twist the dubbing to tighten it. By varying the amount of pressure you can dramatically alter the finished effect, which is something you will learn with experience. To begin with you can apply too little pressure, but you can’t apply too much! Too little pressure is a very common fault with beginners.
Done correctly you will be left with something like this.
![[image]](https://i0.wp.com/i159.photobucket.com/albums/t149/scot2flyfish/Dubbing%20Techniques/Twist-Dubbing-7.jpg)
As you can see I have only used a little here. Not enough to cover the whole body, but it is easy to add a little more if necessary.
![[image]](https://i0.wp.com/i159.photobucket.com/albums/t149/scot2flyfish/Dubbing%20Techniques/Twist-Dubbing-8.jpg)
Now start wrapping to form the body. You will notice that I have slid the dubbing up the thread so that the body is being formed from the very first turn.
![[image]](https://i0.wp.com/i159.photobucket.com/albums/t149/scot2flyfish/Dubbing%20Techniques/Twist-Dubbing-9.jpg)
It’s now simply a case of wrapping towards the hook eye to form the completed body. Notice that there is a gap between the end of the body and the hook eye. If this was a fly I was tying I could now add another small pinch of dubbing to complete the body. Much easier than using too much and having to pinch it off.
![[image]](https://i0.wp.com/i159.photobucket.com/albums/t149/scot2flyfish/Dubbing%20Techniques/Twist-Dubbing-10.jpg)
This is a simple fairly level body such as I would use on a Shipman’s Buzzer or similar fly.
As I mentioned earlier you can affect the final appearance by varying the amount of pressure you apply to the dubbing. Here I have applied much more pressure at the start of the dubbing than at the end. Of course, as you can see I’ve also added a little more dubbing at the end as well. The result of using one or both techniques is a tapered body. By varying the pressure and/or the amount of dubbing and its placement you can easily build a ready made taper into the body. Which technique or techniques you use or prefer is something you will learn with experience.
The tapered dubbing noodle.
![[image]](https://i0.wp.com/i159.photobucket.com/albums/t149/scot2flyfish/Dubbing%20Techniques/Twist-Dubbing-11.jpg)
The effect.
![[image]](https://i0.wp.com/i159.photobucket.com/albums/t149/scot2flyfish/Dubbing%20Techniques/Twist-Dubbing-12.jpg)
That is twist dubbing, a fairly simple process. By following the few simple guidelines above and with a little practice you will soon master this technique.
Pay particular attention to the pressure. As mentioned earlier, one of the most common mistakes beginners make is applying too little pressure when squeezing and twisting the dubbing.
The following are a few ideas for you to contemplate and, hopefully, find inspiration from.
Here I have wrapped a body of copper wire, then twist dubbed the wire with a little fiery brown seal’s fur and wrapped it back up as a rib.
![[image]](https://i0.wp.com/i159.photobucket.com/albums/t149/scot2flyfish/Dubbing%20Techniques/TDN.jpg)
Here I have wrapped a yellow silk body and tied in a gold wire rib, then twist dubbed the wire with super fine dry fly dub before wrapping to form the rib.
![[image]](https://i0.wp.com/i159.photobucket.com/albums/t149/scot2flyfish/Dubbing%20Techniques/TDN-2.jpg)
Finally this one is a body of black Orvis Spectrablend ribbed with oval gold tinsel twist dubbed with a little Peacock Spectrablend.
![[image]](https://i0.wp.com/i159.photobucket.com/albums/t149/scot2flyfish/Dubbing%20Techniques/TDN-3.jpg)
TOUCH DUBBING
Touch dubbing is a versatile technique, most suited to mediums with a short staple length, mole being a classic example. Many other mediums can be used though, such as Hare’s Ear and Z-Lon (shown in the preparation posting)
Touch dubbing is the only technique I use wax on. There are several makes of wax suitable for touch dubbing, the one I use is BT’s Dubbing Wax, distributed by Veniards. As well as wax you can also use glue sticks, such as Pritt stick.
BT’s Dubbing Wax is supplied in two formulas, tacky for flies size 12 and smaller, and super tacky for flies size 10 and larger. I must admit I use super tacky almost all the time.
![[image]](https://i0.wp.com/i159.photobucket.com/albums/t149/scot2flyfish/Dubbing%20Techniques/TouchDub.jpg)
When using dubbing wax you want a thin, even coating of wax on the thread. If your wax looks like this you will find it impossible.
![[image]](https://i0.wp.com/i159.photobucket.com/albums/t149/scot2flyfish/Dubbing%20Techniques/TouchDub1.jpg)
A tip I recently picked up is to simply wipe it on a post-it note to remove all the gunk.
![[image]](https://i0.wp.com/i159.photobucket.com/albums/t149/scot2flyfish/Dubbing%20Techniques/TouchDub2.jpg)
One you’ve done that you will find it easy to achieve an even coat.
To touch dub, apply a light even coat of wax to the thread. One or two wipes with the wax are all that is needed.
![[image]](https://i0.wp.com/i159.photobucket.com/albums/t149/scot2flyfish/Dubbing%20Techniques/TouchDub3.jpg)
![[image]](https://i0.wp.com/i159.photobucket.com/albums/t149/scot2flyfish/Dubbing%20Techniques/TouchDub4.jpg)
Once coated, take your dubbing medium, in this case mole fur, and simply touch it against the waxed thread.
![[image]](https://i0.wp.com/i159.photobucket.com/albums/t149/scot2flyfish/Dubbing%20Techniques/TouchDub5.jpg)
A few fibres will stick to the wax.
![[image]](https://i0.wp.com/i159.photobucket.com/albums/t149/scot2flyfish/Dubbing%20Techniques/TouchDub6.jpg)
As you can see there are only a few fibres stuck to the thread in this example. When you wrap to form the body the thread will show through the dubbing.
![[image]](https://i0.wp.com/i159.photobucket.com/albums/t149/scot2flyfish/Dubbing%20Techniques/TouchDub7.jpg)
You can vary this effect by altering the amount of dubbing you allow to adhere to the wax. Here I’ve been heavier handed with the “touch”
![[image]](https://i0.wp.com/i159.photobucket.com/albums/t149/scot2flyfish/Dubbing%20Techniques/TouchDub8.jpg)
Which, when wrapped will give a fuller appearance to the resulting body.
![[image]](https://i0.wp.com/i159.photobucket.com/albums/t149/scot2flyfish/Dubbing%20Techniques/TouchDub9.jpg)
That’s all there is to it, a simple but very versatile technique, which with practice and experience you will be able to achieve whichever effect you want from the merest hint of dubbing to a full fat body.
Here are some variations on the theme again for inspiration.
Light hare’s mask touch dubbed on gold wire and wrapped as a rib.
![[image]](https://i0.wp.com/i159.photobucket.com/albums/t149/scot2flyfish/Dubbing%20Techniques/Twdn.jpg)
Green wire touch dubbed with olive hare’s ear blend and wrapped as a rib.
![[image]](https://i0.wp.com/i159.photobucket.com/albums/t149/scot2flyfish/Dubbing%20Techniques/Twdn1.jpg)
Claret mole touch dubbed on an orange grizzle stripped hackle and wrapped to form the body.
![[image]](https://i0.wp.com/i159.photobucket.com/albums/t149/scot2flyfish/Dubbing%20Techniques/Twdn2.jpg)
TWIST AND TOUCH
A variation on the touch dubbing theme is the twist and touch. Basically the same technique, but with a twist.
Apply wax to the thread as above and touch the waxed thread with the dubbing (I’ve used dyed claret mole here) but this time as you touch the dubbing against the waxed thread, twist the thread clockwise with your other hand.
![[image]](https://i0.wp.com/i159.photobucket.com/albums/t149/scot2flyfish/Dubbing%20Techniques/TwistnTouch.jpg)
Continue doing this until you have the required amount of dubbing on the thread.
![[image]](https://i0.wp.com/i159.photobucket.com/albums/t149/scot2flyfish/Dubbing%20Techniques/TwistnTouch1.jpg)
Then when you wrap the dubbed thread you will see a different effect from the normal touch dubbed thread.
![[image]](https://i0.wp.com/i159.photobucket.com/albums/t149/scot2flyfish/Dubbing%20Techniques/TwistnTouch2.jpg)
As with the normal touch dubbing technique you can vary the amount of dubbing to influence the final outcome.
THE DUBBING LOOP
This is the traditional dubbing loop. It is a stronger dubbing loop than the split thread loop because you are effectively forming a loop of two threads thickness, as opposed to the split thread loop where you split a single thread. Its obvious advantage is its strength, making it ideal for coarser or bulkier dubbings. Its one real disadvantage is that because you are effectively doubling the thread thickness, bulk can become an issue, though in most situations the issue is very minor. After forming the loop the techniques involved in applying the dubbing are identical to the split thread loop.
For this technique you will need a dubbing whorl, shown here. This tool is used to spin the loop, doing the job the bobbin does in the split thread loop.
![[image]](https://i0.wp.com/i159.photobucket.com/albums/t149/scot2flyfish/Dubbing%20Techniques/whorl.jpg)
To form the loop..
Wrap the thread to the mid point of the hook shank, then lengthen the amount of thread from the bobbin to the hook, take it round your finger(s) and back up to the hook.
![[image]](https://i0.wp.com/i159.photobucket.com/albums/t149/scot2flyfish/Dubbing%20Techniques/DubbingLoop.jpg)
Then continue wrapping the thread down (to the left) the hook shank, trapping both legs of the loop as you go.
![[image]](https://i0.wp.com/i159.photobucket.com/albums/t149/scot2flyfish/Dubbing%20Techniques/DubbingLoop1.jpg)
When you reach the point where you want the dubbing loop to be, stop wrapping and take the loop in your other hand.
![[image]](https://i0.wp.com/i159.photobucket.com/albums/t149/scot2flyfish/Dubbing%20Techniques/DubbingLoop2.jpg)
Then take the working thread and wrap it once round the loop next to the hook shank. This closes the loop at the hook shank.
![[image]](https://i0.wp.com/i159.photobucket.com/albums/t149/scot2flyfish/Dubbing%20Techniques/DubbingLoop3.jpg)
![[image]](https://i0.wp.com/i159.photobucket.com/albums/t149/scot2flyfish/Dubbing%20Techniques/DubbingLoop4.jpg)
Now attach the dubbing whorl to the loop and you’re ready to use the loop.
![[image]](https://i0.wp.com/i159.photobucket.com/albums/t149/scot2flyfish/Dubbing%20Techniques/DubbingLoop5.jpg)
At this point I normally hang one leg of the loop over the star wheel of my vice to keep it open, using the weight of the whorl to keep a tension on the loop. If you leave it to just hang it will invariable spin of its own accord, you will then have to unspin it. A minor inconvenience, but an inconvenience all the same and easily avoided.
![[image]](https://i0.wp.com/i159.photobucket.com/albums/t149/scot2flyfish/Dubbing%20Techniques/DubbingLoop6.jpg)
As said above, the techniques used to apply the dubbing to the dubbing loop are identical to the split thread loop.
Here I have applied seal’s fur to one leg of the loop.
![[image]](https://i0.wp.com/i159.photobucket.com/albums/t149/scot2flyfish/Dubbing%20Techniques/DubbingLoop7.jpg)
As before, remove your fingers and the loop closes.
![[image]](https://i0.wp.com/i159.photobucket.com/albums/t149/scot2flyfish/Dubbing%20Techniques/DubbingLoop8.jpg)
Now spin the dubbing whorl.
![[image]](https://i0.wp.com/i159.photobucket.com/albums/t149/scot2flyfish/Dubbing%20Techniques/DubbingLoop9.jpg)
And the dubbing rope is formed.
![[image]](https://i0.wp.com/i159.photobucket.com/albums/t149/scot2flyfish/Dubbing%20Techniques/DubbingLoop10.jpg)
Now wrap your dubbing rope to form the body. When you reach the end of the body tie the dubbing rope off the same as you would any other material.
![[image]](https://i0.wp.com/i159.photobucket.com/albums/t149/scot2flyfish/Dubbing%20Techniques/DubbingLoop11.jpg)
The body finished and the rope tied off.
![[image]](https://i0.wp.com/i159.photobucket.com/albums/t149/scot2flyfish/Dubbing%20Techniques/DubbingLoop12.jpg)
In this sequence I have inserted a small seals fur dubbing noodle into the loop.
![[image]](https://i0.wp.com/i159.photobucket.com/albums/t149/scot2flyfish/Dubbing%20Techniques/DubbingLoop13.jpg)
Then spun the whorl to form the dubbing rope.
![[image]](https://i0.wp.com/i159.photobucket.com/albums/t149/scot2flyfish/Dubbing%20Techniques/DubbingLoop14.jpg)
Finally, wrapping and tying off the rope.
![[image]](https://i0.wp.com/i159.photobucket.com/albums/t149/scot2flyfish/Dubbing%20Techniques/DubbingLoop15.jpg)
Some more ideas for you to mull over and amuse yourself with.
Here I tied in 3 peacock herls then twisted them round one leg of the loop and applied a pinch of peacock Orvis Spectrablend to the other leg. Then spun them and wrapped the resultant rope to form an interesting body.
![[image]](https://i0.wp.com/i159.photobucket.com/albums/t149/scot2flyfish/Dubbing%20Techniques/DubbingLoop16.jpg)
One final idea for you.
Here I have twist dubbed some fiery brown flash bright onto one leg and on the other leg I have twist dubbed black and orange seal’s fur.
![[image]](https://i0.wp.com/i159.photobucket.com/albums/t149/scot2flyfish/Dubbing%20Techniques/DubbingLoop17.jpg)
Then spun the loop to form the rope, and wrapped to form the body.
![[image]](https://i0.wp.com/i159.photobucket.com/albums/t149/scot2flyfish/Dubbing%20Techniques/DubbingLoop18.jpg)
Then a rub with Velcro, and..
![[image]](https://i0.wp.com/i159.photobucket.com/albums/t149/scot2flyfish/Dubbing%20Techniques/DubbingLoop19.jpg)
Split Thread Dubbing Loop
Firstly, apologies in advance. Due to the complexities involved in photographing some of the following sequences, some of the pictures are a little lower quality than I would have liked. But, until I can get a couple of extra pairs of arms they are the best I can do. Don’t worry though; they are clear enough to allow you to see everything.
Dubbing loops are the most versatile techniques you can have at your disposal. As you will hopefully see in this and the next three posts, the opportunities are almost endless. We’ll start with the split thread dubbing loop, this is, I think the most useful of the “loop” techniques. You can employ it to tie everything from large saltwater patterns all the way down to size 32 midges if you want. Its main advantages are that it’s quick and easy to perform, and it adds little if any bulk to the dressing. It doesn’t really have any disadvantages, the only thing you have to be aware of is that because you are splitting the thread it won’t be as strong as the traditional dubbing loop (shown in the next post) but, unless you are try to use coarse dubbing mediums, strength doesn’t really come in to it. Thread is not particularly strong and there is a limit to how much you spin it, it would be impossible for me to demonstrate just how far you can go, but with both the split thread and the traditional dubbing loops you will very quickly learn how much spin you can apply without breaking the thread.
Although the techniques employed to form the split thread and the traditional dubbing loop are different, once formed the techniques employed to apply the dubbing are the exact same for both loops.
Thread choice is important for the split thread dubbing techniques. Basically there are two types of thread, bonded and unbonded. Bonded threads are twisted and stuck together (for want of a better description) Unbonded thread is not stuck together. The bonded thread that springs to mind is UNI Thread, I’m sure there are others too. What this means is that because of the manufacturing process it is very difficult to split the thread. So for the spit thread loop it is best to use an unbonded thread. Typical unbonded threads are UTC, Benecchi, Roman Moser Power Silk, Gudebrod, (Gudebrod no longer make flytying threads, but there are plenty of places which still have stock left) Danville’s and Gordon Griffiths.
All of the above unbonded threads are suitable for the split thread loop. For reference I have used UTC70 in the following sequences.
Because you will need to flatten the thread to split it, it is important to know that all threads with the exception of Pearsall’s silks are spun clockwise. This means that to flatten them you will need to spin them anti-clockwise and when you spin the loop to form the dubbing rope you will need to spin them clockwise.
Below is a picture of bonded (on the left) and unbonded (on the right) threads. You can easily see which one is going to be the easiest to split.
![[image]](https://i0.wp.com/i159.photobucket.com/albums/t149/scot2flyfish/Dubbing%20Techniques/SplitThread.jpg)
To form a split thread loop wrap a layer of thread to where you want the loop formed, then spin the bobbin anti-clockwise.
![[image]](https://i0.wp.com/i159.photobucket.com/albums/t149/scot2flyfish/Dubbing%20Techniques/SplitThread1.jpg)
If you’re lucky you will have a flat spot where the thread hangs off the hook. When to spot when you have spun the thread enough to take the twist out of it is something you will learn with very little practice. If you don’t get the flat spot next to the hook you can lay the tread, tensioned by the weight of the bobbin, across your index finger, then slide you finger up and down the thread a few times and you should be able to split the thread then.
![[image]](https://i0.wp.com/i159.photobucket.com/albums/t149/scot2flyfish/Dubbing%20Techniques/SplitThread3.jpg)
To split the thread take a dubbing needle or darning needle or similar and preferably one with a blunt point and insert it through the (roughly) middle of the thread. Don’t worry, it sounds difficult, but in reality with a little practice it is actually quite easy.
![[image]](https://i0.wp.com/i159.photobucket.com/albums/t149/scot2flyfish/Dubbing%20Techniques/SplitThread4.jpg)
You can see the split better here.
![[image]](https://i0.wp.com/i159.photobucket.com/albums/t149/scot2flyfish/Dubbing%20Techniques/SplitThread5.jpg)
Once you have split it, gently coax the thread loop open until you can get your finger(s) into it, then continue coaxing it open until you have a loop large enough to work with. If the loop sticks when you are opening it, try turning the bobbing anti-clockwise a few turns, this will usually sort the problem. Occasionally though you will encounter a spool of thread which doesn’t split well. In this case try a different spool of thread.
![[image]](https://i0.wp.com/i159.photobucket.com/albums/t149/scot2flyfish/Dubbing%20Techniques/SplitThread6.jpg)
That’s all there is to it.
You now have several choices on how you apply the dubbing.
The first technique here is to simply twist dub (See the twist dubbing post) the thread on one side of the loop.
Here I am twist dubbing some hare’s ear onto the thread. I am keeping the thread open with the fingers of my other hand.
![[image]](https://i0.wp.com/i159.photobucket.com/albums/t149/scot2flyfish/Dubbing%20Techniques/SplitThread7.jpg)
Once you have enough dubbing on the thread..
![[image]](https://i0.wp.com/i159.photobucket.com/albums/t149/scot2flyfish/Dubbing%20Techniques/SplitThread8.jpg)
Remove your fingers from the loop allowing the loop to close.
![[image]](https://i0.wp.com/i159.photobucket.com/albums/t149/scot2flyfish/Dubbing%20Techniques/SplitThread9.jpg)
Then pinch the loop immediately below the dubbed portion.
![[image]](https://i0.wp.com/i159.photobucket.com/albums/t149/scot2flyfish/Dubbing%20Techniques/SplitThread10.jpg)
Then with the loop pinched spin the bobbin holder clockwise.
![[image]](https://i0.wp.com/i159.photobucket.com/albums/t149/scot2flyfish/Dubbing%20Techniques/SplitThread2.jpg)
When you think it has spun enough stop and hold the bobbin holder, then let go of the loop. The twist will shoot up the loop twisting the dubbing and loop into a dubbing rope. If need be you can “force” the twist up the thread by holding the bobbin in one hand and gripping the thread at the end of the bobbin with the index finger and thumb of your other hand, then sliding your fingers up towards the dubbing rope will “force” the twist up. If you haven’t put enough twist into the thread, simply repeat the process until you have. Once done it should look something like this.
![[image]](https://i0.wp.com/i159.photobucket.com/albums/t149/scot2flyfish/Dubbing%20Techniques/SplitThread11.jpg)
Now it is a simple case of wrapping it to form the body. With practice you will learn how much dubbing to use so that the dubbing will run out exactly where you want it to.
![[image]](https://i0.wp.com/i159.photobucket.com/albums/t149/scot2flyfish/Dubbing%20Techniques/SplitThread12.jpg)
As with the other dubbing techniques, with practice, you will be able to affect the final outcome by varying the amount of dubbing you use.
Another technique you can employ is to insert a dubbing noodle into the loop. This dubbing noodle is slightly different to the one shown in the noodle dubbing post in so much as the noodle is formed completely in the hand.
To form the noodle take a pinch of dubbing, hare’s ear here.
![[image]](https://i0.wp.com/i159.photobucket.com/albums/t149/scot2flyfish/Dubbing%20Techniques/SplitThread13.jpg)
Then place it in the palm of your hand and using the index finger of your other hand gently roll it and work it…
![[image]](https://i0.wp.com/i159.photobucket.com/albums/t149/scot2flyfish/Dubbing%20Techniques/SplitThread14.jpg)
Until you have a loose noodle like this.
![[image]](https://i0.wp.com/i159.photobucket.com/albums/t149/scot2flyfish/Dubbing%20Techniques/SplitThread15.jpg)
Now form your split thread loop exactly as before and this time insert the noodle between the two threads of the loop.
![[image]](https://i0.wp.com/i159.photobucket.com/albums/t149/scot2flyfish/Dubbing%20Techniques/SplitThread16.jpg)
Then, as before withdraw your fingers to close the loop.
![[image]](https://i0.wp.com/i159.photobucket.com/albums/t149/scot2flyfish/Dubbing%20Techniques/SplitThread17.jpg)
Then grip the thread loop just below the dubbing noodle.
Then spin the bobbin clockwise to form the dubbing rope.
![[image]](https://i0.wp.com/i159.photobucket.com/albums/t149/scot2flyfish/Dubbing%20Techniques/SplitThread18.jpg)
![[image]](https://i0.wp.com/i159.photobucket.com/albums/t149/scot2flyfish/Dubbing%20Techniques/SplitThread19.jpg)
Finally wrapping as before to form the body.
![[image]](https://i0.wp.com/i159.photobucket.com/albums/t149/scot2flyfish/Dubbing%20Techniques/SplitThread20.jpg)
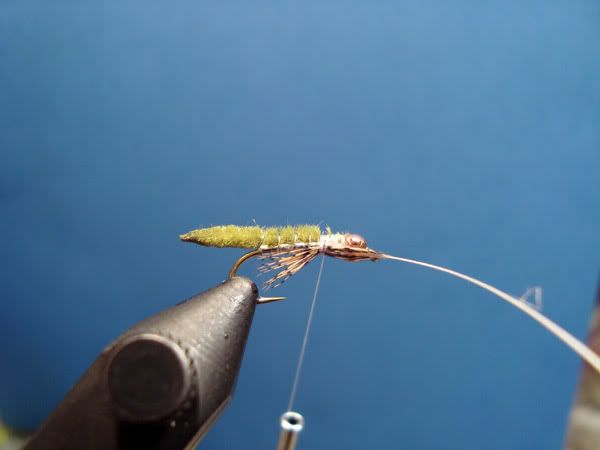
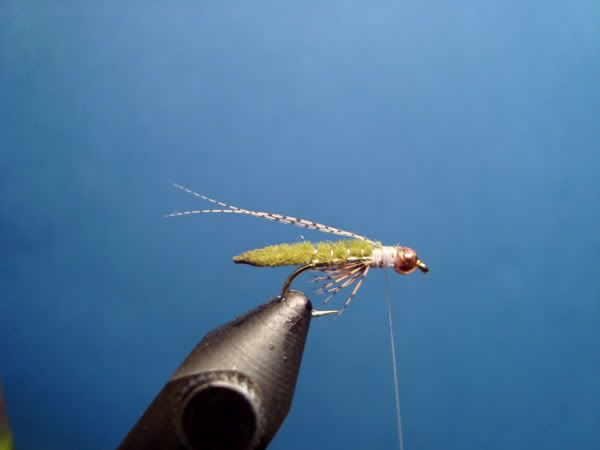
This next technique is great for forming legs or, in this case, a hair hackle.
Form your loop exactly as described above. Then take a pinch of guard hairs, I’ve taken these ones from a fox squirrel pelt, in a bulldog type clip.
![[image]](https://i0.wp.com/i159.photobucket.com/albums/t149/scot2flyfish/Dubbing%20Techniques/SplitThread21.jpg)
Then insert them into the loop. Once you have them in the loop, close and grip it, then release the guard hairs from the clip.
![[image]](https://i0.wp.com/i159.photobucket.com/albums/t149/scot2flyfish/Dubbing%20Techniques/SplitThread22.jpg)
Adjust them for length by gently pulling on either the tips, to make them longer, or the butts to shorten them. Then carefully trim the butts close to the thread.
![[image]](https://i0.wp.com/i159.photobucket.com/albums/t149/scot2flyfish/Dubbing%20Techniques/SplitThread23.jpg)
Then, again, exactly as above, grip the thread and spin the bobbin to form your dubbing rope.
![[image]](https://i0.wp.com/i159.photobucket.com/albums/t149/scot2flyfish/Dubbing%20Techniques/SplitThread24.jpg)
This time when you wrap the rope, stroke the fibres back (to the left) with each wrap of the rope.
![[image]](https://i0.wp.com/i159.photobucket.com/albums/t149/scot2flyfish/Dubbing%20Techniques/SplitThread25.jpg)
When you’ve done it should look something like this.
![[image]](https://i0.wp.com/i159.photobucket.com/albums/t149/scot2flyfish/Dubbing%20Techniques/SplitThread26.jpg)
So there you have three techniques you can employ with the split thread loop. There are a few variations, (which will appear in future step by steps) but these three are all that you will need to master the techniques involved.
You can use one, two or all three techniques in a great many flies.
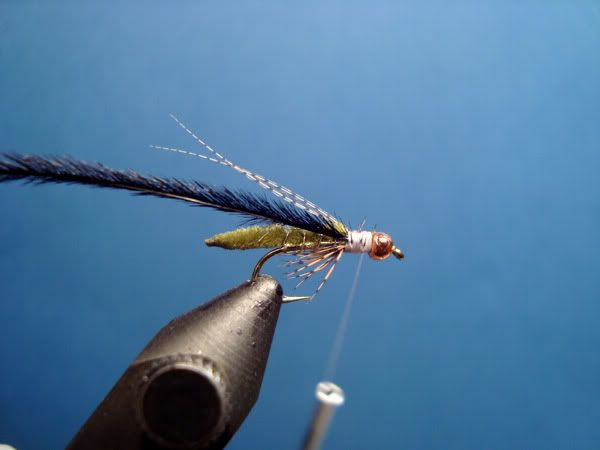
Here is one example of a hare’s ear type nymph where I have twist dubbed the thread onto the loop to form the body. Then I’ve inserted a dubbing noodle into the loop for the thorax. Finally forming a hair hackle to finish the fly.
![[image]](https://i0.wp.com/i159.photobucket.com/albums/t149/scot2flyfish/Dubbing%20Techniques/SplitThread33.jpg)
Here’s one simple variation though for you.
Try dubbing both sides of the loop with different dubbing. To let you see the effect better here, I’ve dubbed one side with black beaver and the other side with white beaver.
![[image]](https://i0.wp.com/i159.photobucket.com/albums/t149/scot2flyfish/Dubbing%20Techniques/SplitThread29.jpg)
Spin the loop as above and it looks like this.
![[image]](https://i0.wp.com/i159.photobucket.com/albums/t149/scot2flyfish/Dubbing%20Techniques/SplitThread30.jpg)
And wrapped it looks like this.
![[image]](https://i0.wp.com/i159.photobucket.com/albums/t149/scot2flyfish/Dubbing%20Techniques/SplitThread31.jpg)
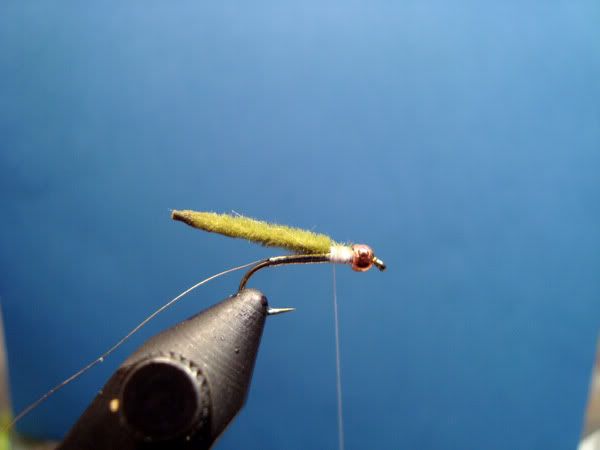
Here is a fly I’ve tied as above, but this time I’ve used olive and yellow beaver. The thorax was formed from a split thread loop with a noodle of olive hare’s ear blend inserted. The effect is subtle and, I think, attractive.
![[image]](https://i0.wp.com/i159.photobucket.com/albums/t149/scot2flyfish/Dubbing%20Techniques/SplitThread32.jpg)
If you want to get complicated you can combine the dubbing loop and split thread loop!
Here I have formed a dubbing loop then split one leg of the loop and inserted an orange and a black slf dubbing noodle into the split thread. Then I inserted a pearl ice dub dubbing noodle in the dubbing loop.
![[image]](https://i0.wp.com/i159.photobucket.com/albums/t149/scot2flyfish/Dubbing%20Techniques/SplitThread34.jpg)
Then gave it a spin for an interesting dubbing rope.
![[image]](https://i0.wp.com/i159.photobucket.com/albums/t149/scot2flyfish/Dubbing%20Techniques/SplitThread35.jpg)
Wrapped to form the body.
![[image]](https://i0.wp.com/i159.photobucket.com/albums/t149/scot2flyfish/Dubbing%20Techniques/SplitThread36.jpg)
Then a rub with Velcro for the resulting body.
![[image]](https://i0.wp.com/i159.photobucket.com/albums/t149/scot2flyfish/Dubbing%20Techniques/SplitThread37.jpg)
As you can see, once you’ve mastered the basic techniques involved you can let your imagination and creativity run wild.
NOT A LOOP
Hopefully what follows will provide you with some inspiration and encourage you to sometimes “think out of the box”
Most of what is here is a direct result of the inspiration I have received looking at the techniques subtly introduced to us in the many recipes and pictures of flies posted here (and elsewhere) by, among others, Hans Weilenmann
The following are variations on the dubbing loop technique that opens up a myriad of possibilities, only a few of which I’ve shown below. As with the techniques shown above the only real limit is your imagination.
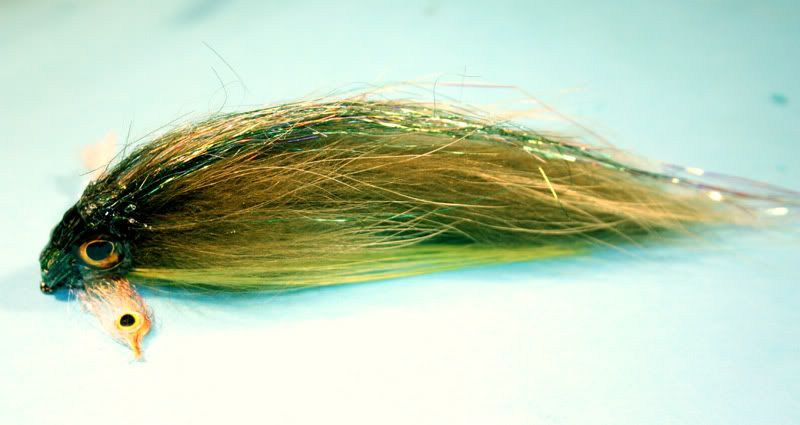
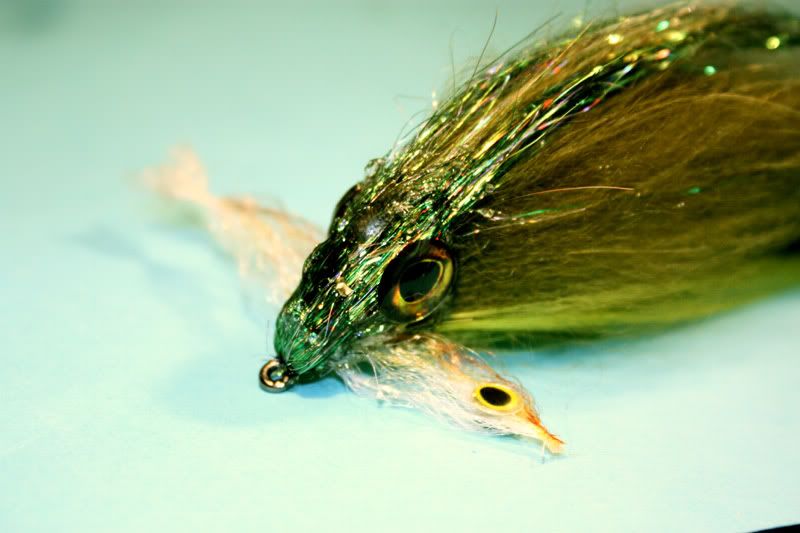
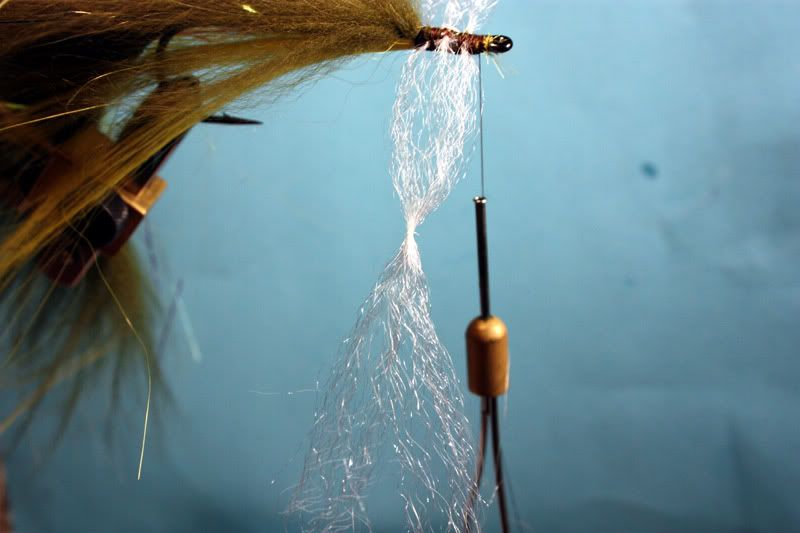
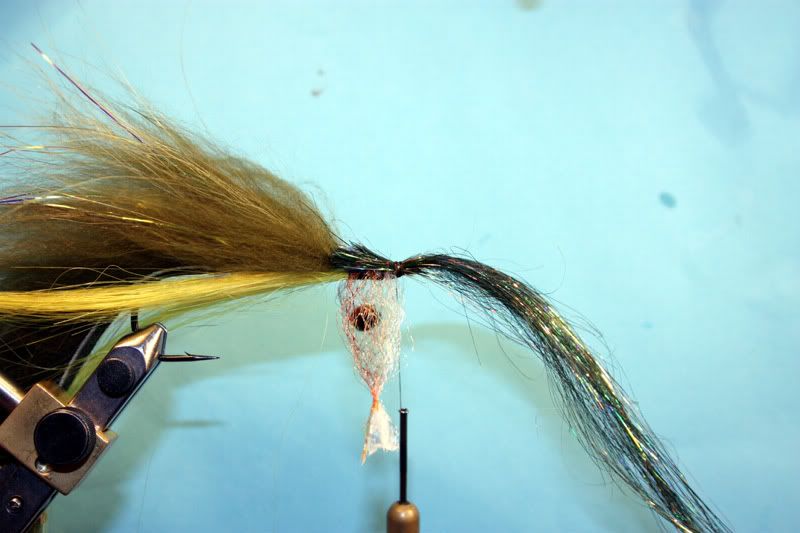
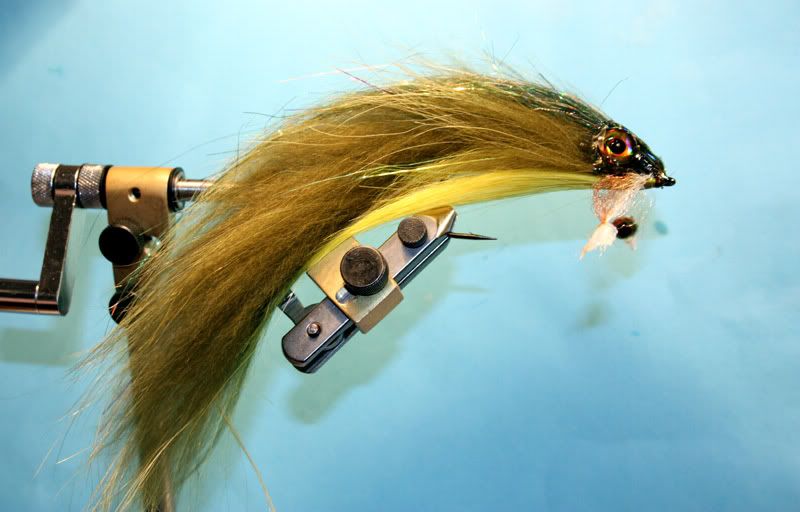
Here I have inserted some natural seal’s fur between two plys of sparkle yarn. Then gripped the resultant “loop” in a pair of rotating hackle pliers.
![[image]](https://i0.wp.com/i159.photobucket.com/albums/t149/scot2flyfish/Dubbing%20Techniques/Not-A-loop-1-1.jpg)
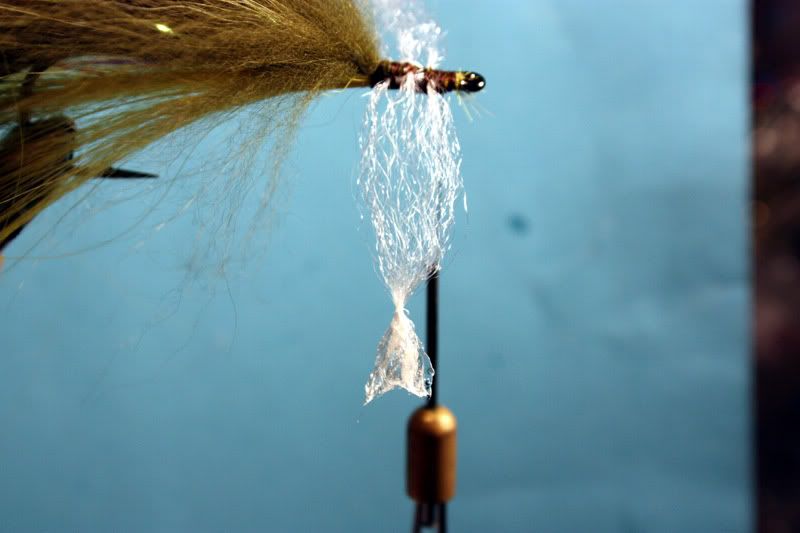
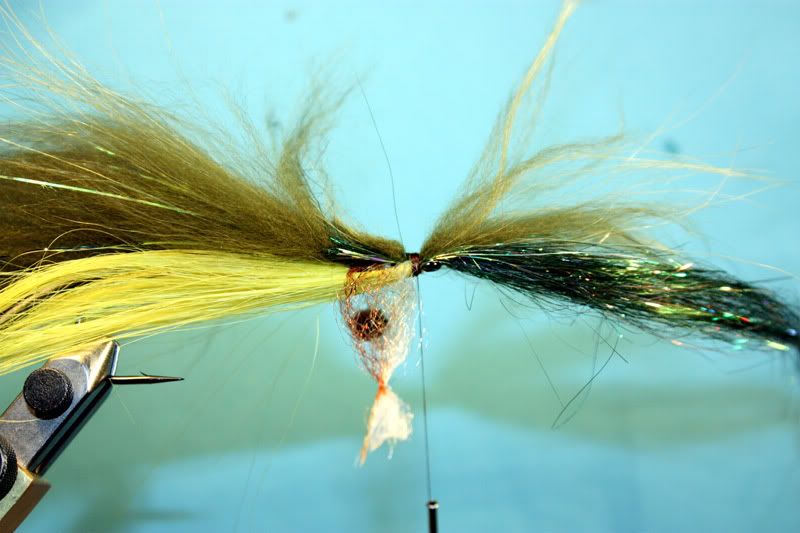
Then using the hackle pliers as a dubbing twister I’ve twisted it into a dubbing rope which I have wrapped to form, in this instance, the whole fly.
![[image]](https://i0.wp.com/i159.photobucket.com/albums/t149/scot2flyfish/Dubbing%20Techniques/Not-A-loop-2-1.jpg)
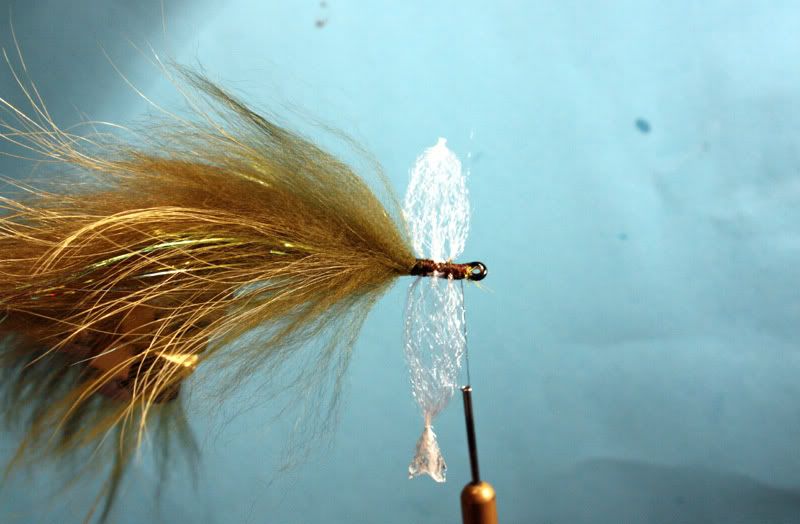
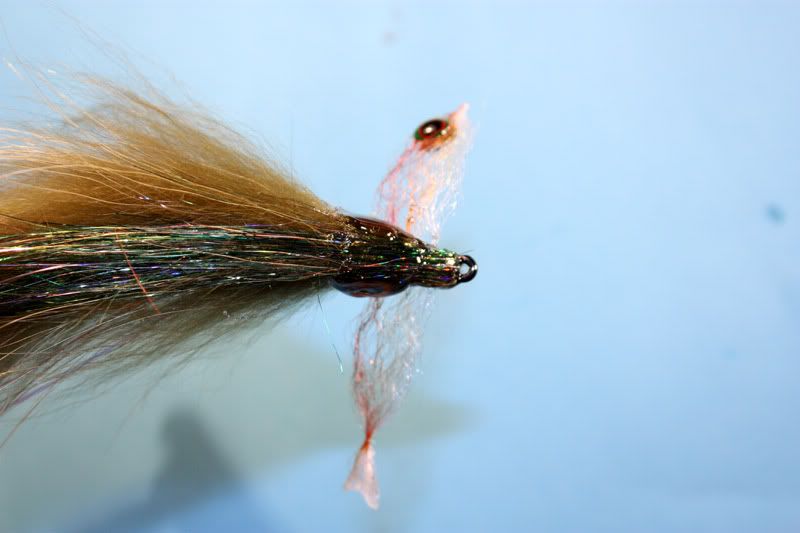
The result when you add water is..
![[image]](https://i0.wp.com/i159.photobucket.com/albums/t149/scot2flyfish/Dubbing%20Techniques/Not-A-loop-3-1.jpg)
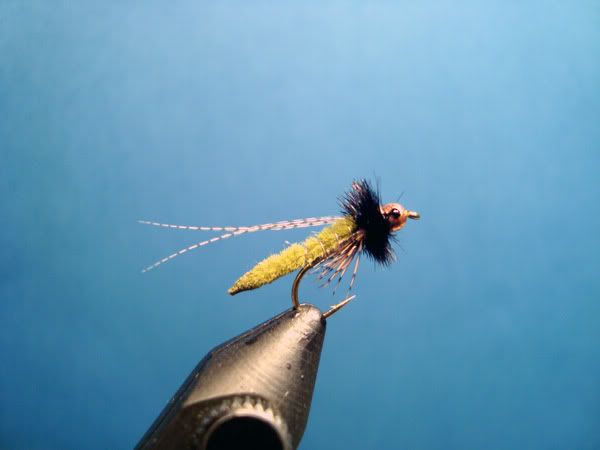
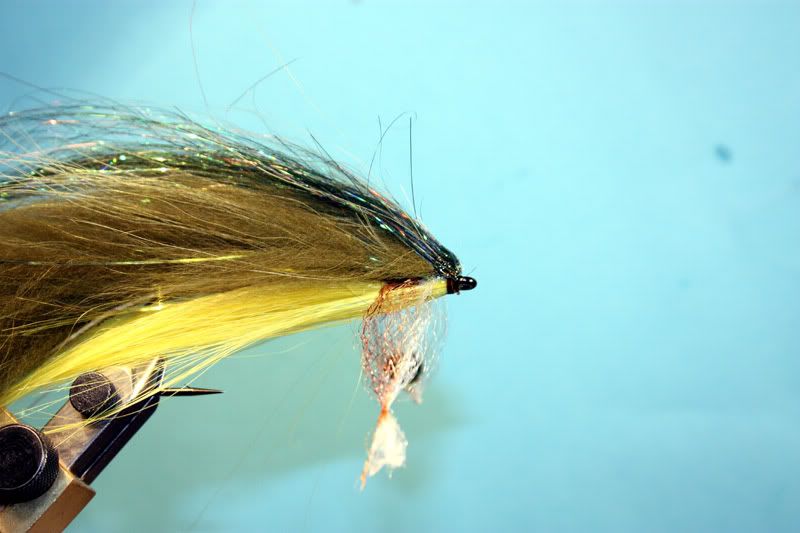
Doesn’t really look much like a fly though! But notice I left a portion of the yarn at the head free of dubbing.
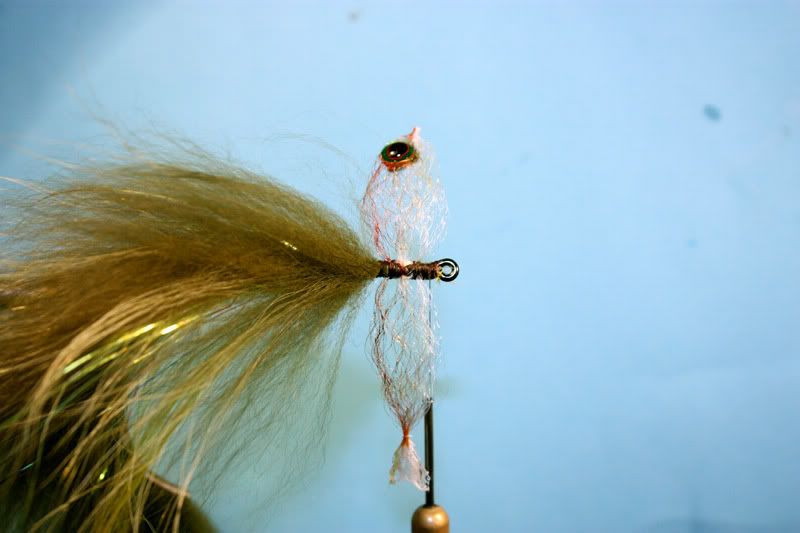
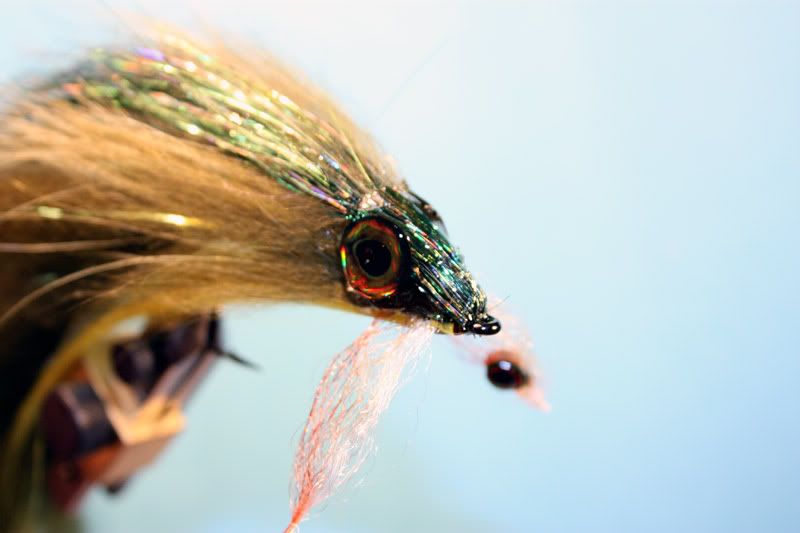
A quick wipe or two with a brown marker pen and, I think, a very passable sedge pupa appears.
![[image]](https://i0.wp.com/i159.photobucket.com/albums/t149/scot2flyfish/Dubbing%20Techniques/Not-A-loop-4-1.jpg)
Here I have inserted a hare’s mask blend of dubbing between 4 strands of pheasant tail fibres.
![[image]](https://i0.wp.com/i159.photobucket.com/albums/t149/scot2flyfish/Dubbing%20Techniques/Notaloop4.jpg)
Then twisted them with my rotating hackle pliers.
![[image]](https://i0.wp.com/i159.photobucket.com/albums/t149/scot2flyfish/Dubbing%20Techniques/Notaloop5.jpg)
The result is an interesting fuzzy body.
![[image]](https://i0.wp.com/i159.photobucket.com/albums/t149/scot2flyfish/Dubbing%20Techniques/Notaloop6.jpg)
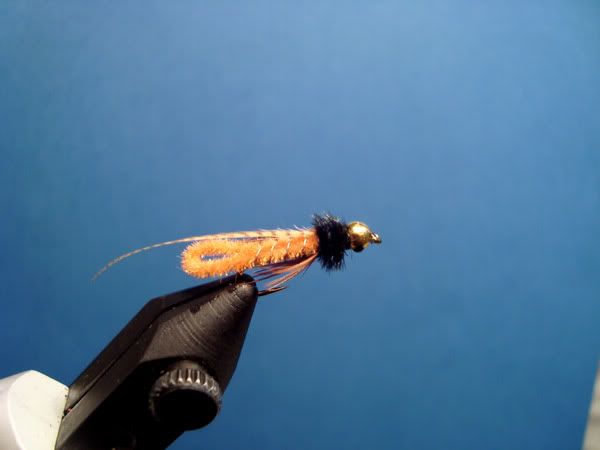
Finally one here using 1 strand of green copper wire and 1 strand of red copper wire with a clear Antron noodle inserted between them.
![[image]](https://i0.wp.com/i159.photobucket.com/albums/t149/scot2flyfish/Dubbing%20Techniques/Notaloop7.jpg)
Then twisted with the rotating pliers again.
![[image]](https://i0.wp.com/i159.photobucket.com/albums/t149/scot2flyfish/Dubbing%20Techniques/Notaloop8.jpg)
And wrapped to form a body.
![[image]](https://i0.wp.com/i159.photobucket.com/albums/t149/scot2flyfish/Dubbing%20Techniques/Notaloop9.jpg)
Finally a rub with Velcro.
![[image]](https://i0.wp.com/i159.photobucket.com/albums/t149/scot2flyfish/Dubbing%20Techniques/Notaloop10.jpg)
The effect when wet is interesting to say the least.
![[image]](https://i0.wp.com/i159.photobucket.com/albums/t149/scot2flyfish/Dubbing%20Techniques/Notaloop11.jpg)
Once again you can see some of the interesting results that are possible when you let your imagination run riot.
Have fun!
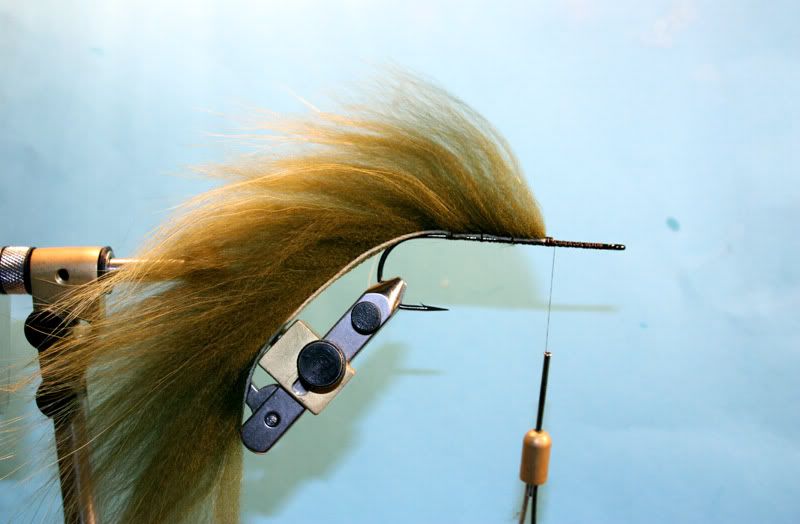
DUBBING NOODLE
This is a technique I rarely use, but it is a useful technique to have in your armoury. Its main use is for bodies on larger flies. This technique is only really suitable for dubbings mediums with a medium to long staple length. Mediums such as Hare’s Ear, Mole, Squirrel, Seal’s Fur, etc don’t really lend themselves to this technique.
For reference the dubbing I have used here is WCB flytying supplies “Easy Dub” a synthetic dubbing.
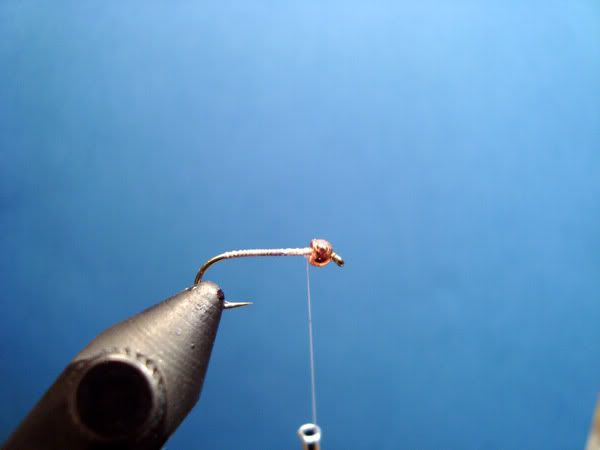
Wind the thread half way down the hook shank.
![[image]](https://i0.wp.com/i159.photobucket.com/albums/t149/scot2flyfish/Dubbing%20Techniques/Noodle.jpg)
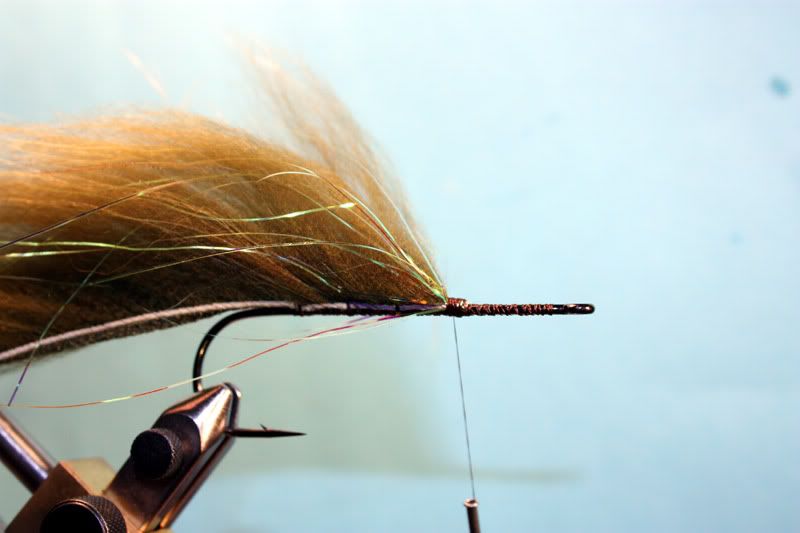
Take a wad of dubbing and pull some out, then twist the end to a point.
![[image]](https://i0.wp.com/i159.photobucket.com/albums/t149/scot2flyfish/Dubbing%20Techniques/Noodle1.jpg)
Then tie it in.
![[image]](https://i0.wp.com/i159.photobucket.com/albums/t149/scot2flyfish/Dubbing%20Techniques/Noodle2.jpg)
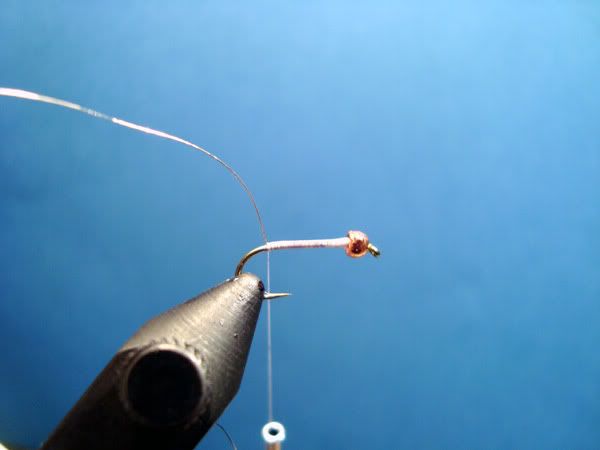
Now place the dubbing next to the thread.
![[image]](https://i0.wp.com/i159.photobucket.com/albums/t149/scot2flyfish/Dubbing%20Techniques/Noodle3.jpg)
Then pinch the dubbing and thread between your fingers. Don’t pinch too tight, you want the dubbing to feed from the wad as you wrap.
![[image]](https://i0.wp.com/i159.photobucket.com/albums/t149/scot2flyfish/Dubbing%20Techniques/Noodle4.jpg)
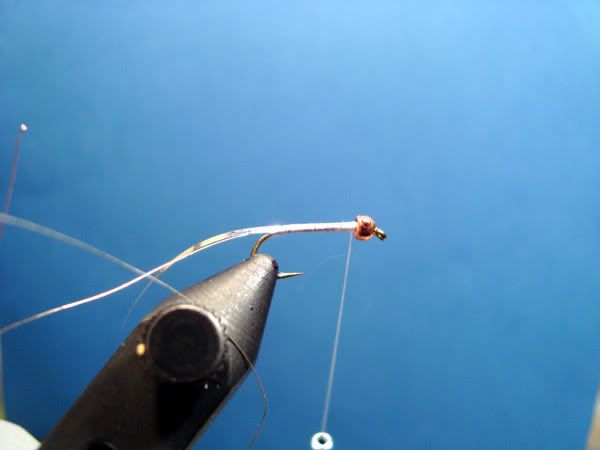
Now start wrapping. With this technique you do not twist the dubbing onto the thread. Any twisting is imparted naturally during the wrapping process.
![[image]](https://i0.wp.com/i159.photobucket.com/albums/t149/scot2flyfish/Dubbing%20Techniques/Noodle5.jpg)
Keep wrapping and feeding from the wad until you reach the tie-off point.
![[image]](https://i0.wp.com/i159.photobucket.com/albums/t149/scot2flyfish/Dubbing%20Techniques/Noodle6.jpg)
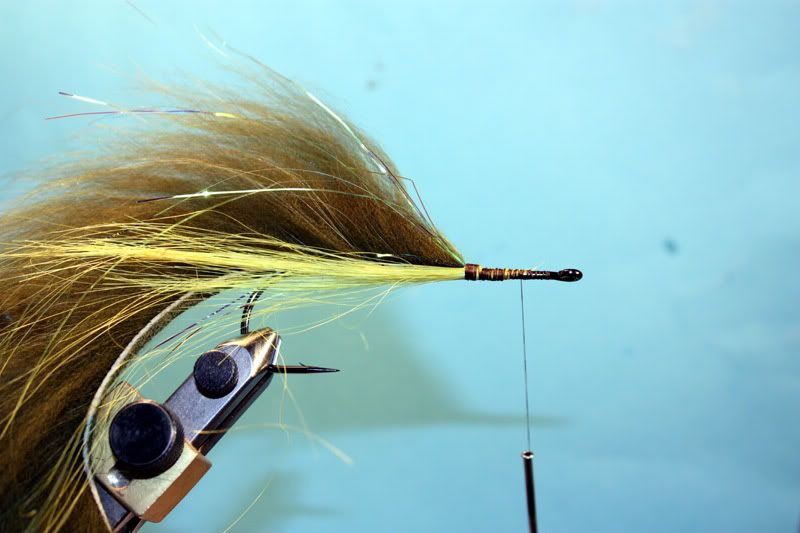
Separate the thread from the dubbing and then tie in the end of the dubbing noodle.
![[image]](https://i0.wp.com/i159.photobucket.com/albums/t149/scot2flyfish/Dubbing%20Techniques/Noodle7.jpg)
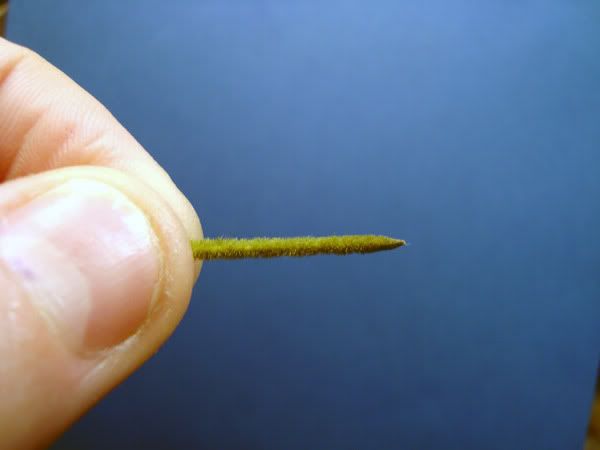
And that’s it, a quick and easy way to apply a larger amount of dubbing to the hook. It’s also much stronger than normal dubbing techniques.
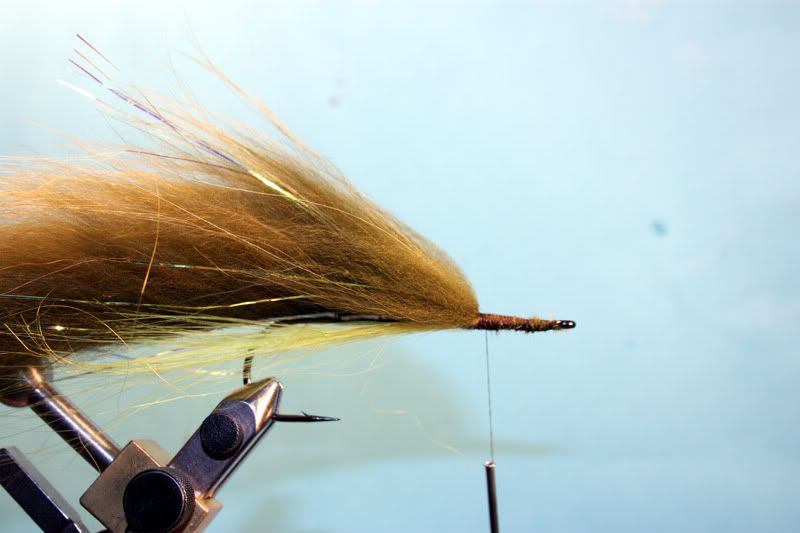
I scrubbed this much harder than I normally would with a Velcro brush.
![[image]](https://i0.wp.com/i159.photobucket.com/albums/t149/scot2flyfish/Dubbing%20Techniques/Noodle8.jpg)
Had I scrubbed the same material, twist dubbed, as hard I don’t think there would have been much left! But with this technique..
![[image]](https://i0.wp.com/i159.photobucket.com/albums/t149/scot2flyfish/Dubbing%20Techniques/Noodle9.jpg)
A simple example of this techniques usefulness..
![[image]](https://i0.wp.com/i159.photobucket.com/albums/t149/scot2flyfish/Dubbing%20Techniques/Noodle10.jpg)
THE DOUBLE LOOP
I swithered on whether to include this technique or not. It is a little used technique, but decided to include it anyway, if for no other reason than it’s here if you want it. This is the double loop, for use with very coarse dubbings. In this instance Deer hair dubbing. This one from Roman Moser is a blend of Deer hair and synthetic fibres. You can also use Deer hair cut from the hide if you like.
![[image]](https://i0.wp.com/i159.photobucket.com/albums/t149/scot2flyfish/Dubbing%20Techniques/DoubleLoop.jpg)
As its name suggests this technique utilizes two loops. The obvious advantage is its strength. Its one disadvantage is bulk, though again, in reality it is a really minor disadvantage.
The dubbing whorl used for the dubbing loop is not up to the task for this technique, the sprung wire is not strong enough to tighten the spun rope tight enough. You need to use a different tool.
The dubbing twister.
![[image]](https://i0.wp.com/i159.photobucket.com/albums/t149/scot2flyfish/Dubbing%20Techniques/DoubleLoop1.jpg)
This tool differs from the dubbing whorl in that rather than spinning it to form the dubbing rope, you simply twist it with your fingers to form the rope.
To begin, wrap the thread to around the midpoint of the hook shank.
![[image]](https://i0.wp.com/i159.photobucket.com/albums/t149/scot2flyfish/Dubbing%20Techniques/DoubleLoop2.jpg)
Then start by forming a normal dubbing loop using the dubbing twister as an aid. Unlike the normal dubbing loop you do not take a turn of thread round the loop.
![[image]](https://i0.wp.com/i159.photobucket.com/albums/t149/scot2flyfish/Dubbing%20Techniques/DoubleLoop3.jpg)
Then wrap the thread towards the bend and over the legs of the dubbing loop.
![[image]](https://i0.wp.com/i159.photobucket.com/albums/t149/scot2flyfish/Dubbing%20Techniques/DoubleLoop4.jpg)
Once you have reached the bend, wrap the thread back up the body (to the right) for three or four turns.
![[image]](https://i0.wp.com/i159.photobucket.com/albums/t149/scot2flyfish/Dubbing%20Techniques/DoubleLoop5.jpg)
Then form a second loop. You need both loops to be the same length, so form the second loop using the dubbing twister to ensure both loops are the same length.
![[image]](https://i0.wp.com/i159.photobucket.com/albums/t149/scot2flyfish/Dubbing%20Techniques/DoubleLoop6.jpg)
Let’s take a little break here and go over how to form and use the double loop in a little more detail. Because of the difficulties of trying to photograph this one with the deer hair dubbing I’m using a synthetic dubbing noodle to simulate the dubbing. The noodle makes it much easier for me to photograph and it will also let you see things in more detail.
So here I’ve formed the first loop and this time I’ve taken the thread much further up the hook shank so that you can see the loops and how to use them easier.
![[image]](https://i0.wp.com/i159.photobucket.com/albums/t149/scot2flyfish/Dubbing%20Techniques/Detaileddl.jpg)
The second loop formed.
![[image]](https://i0.wp.com/i159.photobucket.com/albums/t149/scot2flyfish/Dubbing%20Techniques/Detaileddl-1.jpg)
As you can see here with the dubbing twister removed we have two separate loops. The dubbing will go between the two loops.
![[image]](https://i0.wp.com/i159.photobucket.com/albums/t149/scot2flyfish/Dubbing%20Techniques/Detaileddl-2.jpg)
Here the dubbing twister is back on and I’ve arrowed where the dubbing will be inserted.
![[image]](https://i0.wp.com/i159.photobucket.com/albums/t149/scot2flyfish/Dubbing%20Techniques/Detailed3.jpg)
Here I’ve re-done the loops closer together and inserted the dubbing noodle.
![[image]](https://i0.wp.com/i159.photobucket.com/albums/t149/scot2flyfish/Dubbing%20Techniques/Detailed4.jpg)
Before you twist the dubbing into a rope you have to take one turn of thread round both loops to pinch them together at the top.
![[image]](https://i0.wp.com/i159.photobucket.com/albums/t149/scot2flyfish/Dubbing%20Techniques/Detailed5.jpg)
![[image]](https://i0.wp.com/i159.photobucket.com/albums/t149/scot2flyfish/Dubbing%20Techniques/Detailed6.jpg)
Next I’ve taken the thread up to the shoulder of the fly, where the body will be tied off.
![[image]](https://i0.wp.com/i159.photobucket.com/albums/t149/scot2flyfish/Dubbing%20Techniques/Detailed7.jpg)
Make the first turn of the dubbing rope at an angle as shown so that your dubbed body starts at the end.
![[image]](https://i0.wp.com/i159.photobucket.com/albums/t149/scot2flyfish/Dubbing%20Techniques/Detailed8.jpg)
Hopefully that’s made things a little clearer for you.
OK, break over, so now it’s back to the deer hair..
Once formed you can insert your dubbing material into the loop.
![[image]](https://i0.wp.com/i159.photobucket.com/albums/t149/scot2flyfish/Dubbing%20Techniques/DoubleLoop8.jpg)
Then take one turn of thread round the two loops to close them at the top, then twist the dubbing twister clockwise to begin forming the rope.
![[image]](https://i0.wp.com/i159.photobucket.com/albums/t149/scot2flyfish/Dubbing%20Techniques/DoubleLoop9.jpg)
Keep twisting until you have the formed rope.
![[image]](https://i0.wp.com/i159.photobucket.com/albums/t149/scot2flyfish/Dubbing%20Techniques/DoubleLoop10.jpg)
Then wrap the dubbing rope to form the body. Stroke the fibres back with each wrap of the rope.
![[image]](https://i0.wp.com/i159.photobucket.com/albums/t149/scot2flyfish/Dubbing%20Techniques/DoubleLoop11.jpg)
Then when you have the body formed tie the rope off.
![[image]](https://i0.wp.com/i159.photobucket.com/albums/t149/scot2flyfish/Dubbing%20Techniques/DoubleLoop12.jpg)
Then all you have to do is trim the hair to shape with scissors.
![[image]](https://i0.wp.com/i159.photobucket.com/albums/t149/scot2flyfish/Dubbing%20Techniques/DoubleLoop13.jpg)
Here I’ve added a wing of cow elk hair to make a simple, but durable sedge.
![[image]](https://i0.wp.com/i159.photobucket.com/albums/t149/scot2flyfish/Dubbing%20Techniques/DoubleLoop14.jpg)
Well finally you’ve reached the end!
I don’t think there’s much to add, from me at least! But as always, the experiences and thoughts of others are most welcome.